Tag Archive for: detoxify

Spring Greens Goodness!

Spring’s arrival marks the beginning of the long-awaited growing season in Minnesota, that abundant time of year when the freshest of fresh produce – in a rainbow of the brightest colors Mother Nature has to offer – entices us to move away from the onions, carrots, and potatoes we survived on all winter and turn our focus to flavorful herbs, tender baby lettuces, bitter greens, and other short-lived spring riches like rhubarb and foraged mushrooms.

For me, spring is synonymous with everything green: super fresh baby salad greens, microgreens, and every kind of nutrient-dense leafy green you can imagine. Traditional medicines like Traditional Chinese Medicine tells us that these are the foods our bodies need to detoxify from the extra fats and sugar we consumed during the winter months, so it shouldn’t be a surprise when we start craving fresh salads in April or May.

Additionally, it is widely accepted that eating a lot of these green foods in autumn to detoxify our bodies in preparation for the heavier foods of winter is also a good idea. When shopping at farmers markets and eating with the seasons, you’ll see that farm fresh greens are often available now in both spring and fall.

Though leafy greens have definitely gained a larger audience the last five years, they still feel mysterious to a lot of folks. The following is a super simple template our CSA farm gave us early into our membership that can be used for kale, Swiss chard, spinach, and even arugula.


Easy Kale

1 bunch kale

1-2 cloves garlic, thinly sliced

1 tablespoon olive oil

red pepper flakes, to taste

Thai fish sauce or balsamic vinegar, to taste


Wash, stem and chop the bunch of kale.

Sauté 1-2 cloves of thinly sliced garlic in the olive oil.

When the garlic begins to turn golden, toss in red pepper flakes to taste and sauté briefly.

*Add the kale and a couple splashes of Thai fish sauce (use balsamic vinegar instead, if you prefer a “sweeter” taste)

Cover and steam until tender.

(*If you don’t like the tougher texture of steamed kale, you can choose at this point to quick-boil the kale in another pot first before adding it to the pan with the fish sauce.)

I often add chopped spicy sausage or chicken to this template in order to make it into more of a meal. If you use balsamic vinegar instead of fish sauce, you can also add dried fruit like currants or raisins to jazz it up. Greens can be a great vehicle for a wide range of satisfying flavors!

xo,

Claudine

A Digestive Superhero

This week I’m excited to introduce you to a digestive superhero I know and love, a veritable Wonder Woman of digestive health: psyllium husk.

Most of you know I love teaching people how to support their digestive health. Talking about poop is as normal to me as talking about the weather, and I feel confident this little seed could help you have such brag-worthy b.m.’s that you’ll start enjoying poop conversations as much as I do.

It’s one of those tools I like to keep in my back pocket, especially when I’m working with folks with constipation. It rarely lets me down.

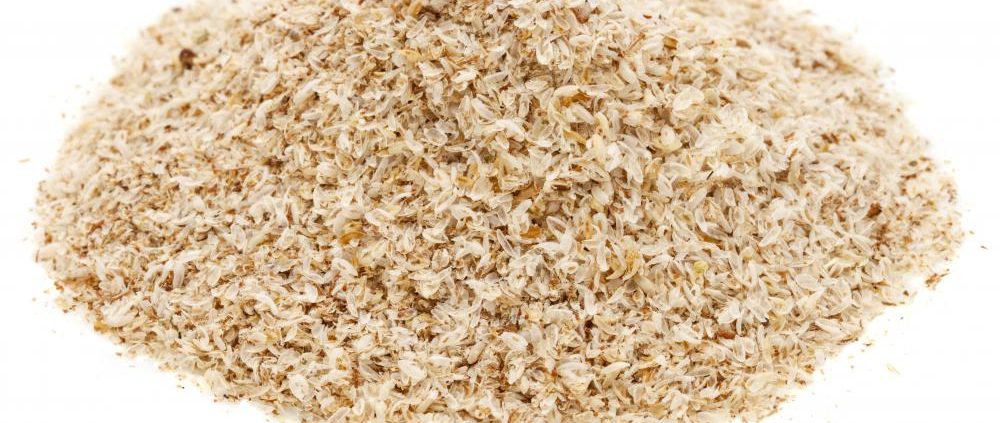
Psyllium, or psyllium husk powder, comes from a shrub-like plant and is chock full of fiber, both soluble and insoluble. Think of psyllium less as food for you and more as food for the millions of bacteria that live in your gut. It’s vitally important we pay attention to and support these bacterial friends since they profoundly influence so many aspects of our health: immune function, mood, weight, digestive well-being, and much more.

In other words, psyllium can help build a healthy and robust bacterial ecosystem, which is critical to overall health.

When the bacteria in our gut feast on all the great fiber in psyllium, they produce a short chain fatty acid called butyrate, which is shown to increase insulin sensitivity and have anti-inflammatory effects, in addition to improving digestion. Furthermore, as this little husk makes its way down the intestinal tract, it absorbs water and forms a spongy gel, which adds bulk to stool, scrubs the intestinal tract clean, and binds to toxins, ushering them out of the body through well-formed stool.

Think of it as an “intestinal soft scrub.”

And yes, while I especially love using psyllium to jumpstart a stalled digestive system, it can also be helpful for those folks on the other end of the digestive spectrum – those who struggle with diarrhea. Because psyllium absorbs water and bulks up, it can help slow down or stop diarrhea.

It can speed things up, slow things down, bulk things out – it’s a digestive superhero!

In addition to enjoying bulkier, more robust stools (yes, these are enjoyable), side benefits of psyllium husk can also include:

  • more stable blood sugar: in general, fiber helps slow down the absorption of sugars into one’s blood stream, which is pretty much always a good thing. Stable blood sugar is a key building block of health.
  • lowering LDL, or “bad,” cholesterol numbers by inhibiting its absorption in your intestines
  • feeling fuller longer, thereby curbing the urge to overeat
  • weight loss, which is inevitable when you start clearing out toxins and built-up stool
  • clearer skin: psyllium husk can help move yeast and fungus out of your body, helping to clear rashes or other skin issues that have been exacerbated by these conditions

So, are you going to give it a try? What do you have to lose? Probably just some old, impacted fecal matter if you ask me, and that will certainly put an extra bounce in your step.

Keep in Mind

For those ready to experiment with this digestive superhero right away, keep the following tips in mind:

  1. Psyllium should not be treated as a replacement for the beneficial fiber you get when eating fresh fruits, vegetables, nuts, and seeds. It’s a SUPPLEMENT. Make sure you’re consuming plenty of whole foods daily. (FYI: 10-12 servings is considered the gold standard these days.)
  2. Drink plenty of water when you take psyllium – at least a full 8-ounce glass. Because psyllium bulks up, it does have the potential to cause an obstruction if someone is chronically dehydrated. Obviously that’s the last thing we want! Staying hydrated is simply a foundational building block of health, so aim for 50-70 ounces of water daily.
  3. Gradually build up the amount you take, starting with just a 1/2 teaspoon a day and increasing to no more than 2 Tablespoons daily. If the intestinal tract has become lazy, it can take some time to get it moving again. Be gentle with your body.
  4. Finally, if you take medications or other vitamin/mineral supplements, consume psyllium either an hour before or two hours after you take your medications, vitamins, or minerals. It can interfere with absorption if taken to close together.

How to Get Your Psylly On

Like any new food or supplement, psyllium can feel a bit mysterious, but it’s actually pretty easy to get into your body.

Most of the time I simply add it to an 8-ounce glass of water and drink it down. That’s likely the easiest method, and it ensures you’re taking it with enough water, which I mentioned is very important.

Other options include adding it to yogurt or smoothies, but you’ll want to make sure to send it down the hatch quickly if you add it to a smoothie. It starts gelling up within minutes and will make your smoothie pretty darn thick. Some people don’t like that texture.

Are you somebody who likes to make protein bars or power balls? You can often sneak in a couple tablespoons of psyllium powder to your recipe, and chances are you won’t even notice it’s in there. Psyllium acts as a binder, too, so it can even help hold gluten-free products together, which is a bonus.

If you have other ideas, please share in the comments section! I always love ideas and feedback!

So what do you say? Are you ready to get your psylly on? If you do, make sure to let me know how it goes.

Love, Claudine

I’ve got the beet! (a recipe you’ll love)

I’ve got the beet! Do you have the beet? If not, I’m sharing a to-die for recipe this week that is far too good to ignore – EVEN IF you haven’t been a beet fan in the past.

Food just doesn’t get any better than the rich, earthy, naturally sweet flavors of fall. This is hands-down my favorite season for playing in the kitchen, and beets top my list of delights.

These robust little buggers make my taste buds do happy gymnastics and make me bust out in song with the Go-Go’s hit, “We’ve Got the Beat!” (MUCH to my husband’s disdain, I must add. Poor guy, but too bad for him; when this girl cooks, she SINGS.)

Some of you know I’m working on a cookbook for the Aslan Institute, the integrative clinic where I have my office. It’s going to be a collection of recipes from all of the amazing practitioners there. Well, this beet recipe is definitely going in that cookbook. It’s tasty and so, so beautiful – it looks like little pieces of crimson stained glass.

One note: while beets taste super sweet to me, every once in a while I run across someone who says beets taste just like dirt. If that’s you, try adding more orange slices and upping the ginger in the recipe. You can even add a teaspoon of allspice to help mask the earthiness and highlight more sweetness.

Beets with Orange Raspberry Vinaigrette

Yield: 6-8 servings

While this dish tastes delicious right away, it actually improves the longer it sits. Don’t hesitate to make this 2-3 days before you plan to serve it, allowing time for the beets to really soak up the orange, raspberry, and ginger flavors.

9-10 medium beets (about the size of golf balls)

2 Tbsp raspberry vinegar

4 Tbsp freshly squeezed orange juice

1 tsp maple syrup

2 Tbsp freshly grated ginger (or more if you want more zing)

1 1/2 tsp sea salt, or to taste

1/2 tsp freshly ground black pepper, or to taste

1/3 cup red onion, diced small (about 1/2 onion)

zest of 2 large navel oranges

segments of 2 large navel oranges

Preheat oven to 375 degrees F. If using fresh beets with tops still attached, trim off beet greens and reserve for another dish.

Give beets a quick, gentle scrub to remove any remaining dirt, taking care not to break the skins, then wrap beets in a big bundle of aluminum foil. If you need to do a couple bundles, that’s okay. Place bundle/s in a baking dish and roast in the oven for about 60 minutes.

A quick note: in my experience, roasting beets is a super forgiving process. You can roast them alongside other dishes in the oven at temperatures varying from 325-425 and not really have to worry about them. Small beets may roast in as little as 30 minutes; very large beets may need 75 minutes.

Remove beets from oven when tender. Open aluminum foil and allow to cool for 5 minutes, or until you can easily handle them. Cut a small slice off the very top and bottom of each beet, then slip beet skins off by rubbing them with your fingers. You’ll be amazed at how quickly they come off!

Dice beets into 1/2-inch cubes and place in a mixing bowl. Add remaining ingredients and mix well. Serve cold or at room temperature.

A note about making your orange segments: I’m fussy about oranges and really dislike having any of the white membrane when I’m using orange segments in salads or desserts. It ruins the texture for me and adds a bitterness I don’t care for. So rather than spending tons of time pulling the white membrane off, there’s a really easy technique you can employ that’s clearly explained in this You Tube video. You just need a really sharp knife to do it. Make sure you do this over a mixing bowl, as it will release a lot of wonderful juice you want to capture.

The benefits of beets are too numerous to disregard these jeweled beauties. Seriously. Beets are known as workhorse detoxifiers, they lower blood pressure, reduce inflammation, and fight against cancer. They also have a ton of fiber, helping us poop regularly. Enjoy!

Love, Claudine